The Ply Wooden Boat Part II Planning Materials

The boat they made on GardenFork.tv, which I was using as the basis for my design, was made of a single sheet of plywood. It was about 24” wide with sides about 12” high. Though Eric from GardenFork.tv is a trim guy, his narrow boat road very low in the water when he launched it as a solo passenger. As I wanted to be able to take my kids (and even other adults) in the boat with me, I decided I would need two (2) sheets of plywood.
With this as a plan, I headed straight to Lowes once we were settled in at Lake George (and I was back from the trip to Fine Woodworking Live I made immediately after arriving).
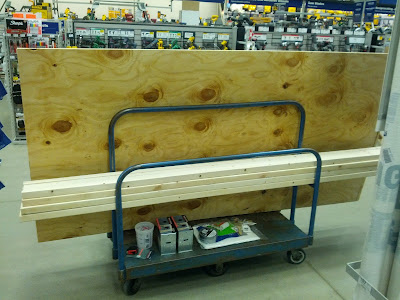
Yep, thats what a boat looks like before its put in the water.
Since the ¼” luan I used on the mock boat was awfully damn thin, and the plywood bottom would need to support me, I opted to use ?” CDX plywood. Though it was bowed and coarsely textured as most CDX is, I felt it provided me the best mix of strength, weight and cost. For the battens, I chose to switch to 2”x2”, so the tips of the screws wouldn’t poke through the ¾” thickness of the 1”x used in the mock boat. I also bought some 2”x4”, metal saw horse brackets and a small drop cloth so I could work at a comfortable height and keep the mess in check.
Ready for ripping!
In the parking lot, I had to rip down the 4’x8’ sheets of plywood before they would fit inside my truck. This being upstate New York, there was no problem woodworking in the parking lot.More (Ply)Wood Boat Posts.
Read More..

Modern Woodworkers Association Podcast 22 Megan Fitspatrick

Current/Future project description
  • Tom’s Bandsaw Box
  • Building Pinewood Derby
  • Chris’ Dollhouse Table
Blog post that piqued our interest
  • St. Petersburg Woodworkers Guild
  • Matt Kenney at Fine Woodworking: It’s impossible to cheat at woodworking
  • Steve Branam hosts Free Woodworking Classes at the New England Home Show (The Furniture Project)
  • The Drunken Woodworker David Picciuto
Goings on in the MWA
  • Lie-Nielsen at 3rd Ward last weekend
  • The Woodworking Show in Western Springfield Massachusetts 1/11/13 - 1/13/13
Main topic
  • Megan Fitzpatrick, the new Editor at Popular Woodworking Magazine
    • Megan discussed taking the reigns at Popular Woodworking magazine, how she got her twitter handle and the up to the minute info on Woodworking in America.
Next broadcast’s topic
  • Scott Meek, of Scott Meek Woodworks, maker of beautiful hand crafted wooden planes.
Where can they find us
  • Modern Woodworkers Association
    • Twitter
      • @MWA_National
      • @tomsworkbench
      • @highrockww
      • @Dyami Plotke
    • Google+
      • Modern Woodworkers Association
      • Chris Atkins
      • Tom Iovino
      • Dyami Plotke
Read More..

The Ply Wooden Boat Part V Sailing The Sea

Now that the boat was built and waterproofed, the only things left to do before it’s maiden voyage were to take it to the lake, and determine how I would propel it. I, of course, decided to take it to the lake first, and fabricate its means of propulsion in the parking lot next to the beach.
Have boat, will travel.
While Eric used a single oar for his GardenFork.tv boat, I found that with the increased width of my boat it was too wide to use a single oar effectively. I made two (2) oars (like a traditional row boat) instead.
I built the oars in the parking lot at the beach.
I attached the U-shaped oar pivots on the dock.
The oars were cut to length on the dock too.
The finished oars.
Making the oars was as simple as cutting a rectangle of scrap ?” plywood, trimming the corners off and then screwing it to a 2”x2”. To act as oar pivots, I cut two U-shaped pieces of plywood and screwed them to the outside face of the batten with ran down the top of each side. The oars simply dropped in the opening, which was cut with enough room to allow the oars to move.
Finally, ready for the open sea.
Finally, the boat (dubbed the S.S. Sea Man) was ready to set sail.My cousins, Doug and Robert, and I carried it passed the rocks (Lake George is beautiful, but lacks sandy beaches) and into the water. I gave it a brief moment to confirm it was watertight. Then I hopped in and I set off rowing.
Row like the wind.
The boat was in and out of the water for three (3) or four (4) days over the course of our vacation. It proved a stable craft. My kids (and cousin) enjoyed going out on the boat and it proved a stable platform for launching firecrackers. I was able to successfully carry two (2) adults and probably could have managed a third.
I did ultimately get the hand of steering it with the oars.
After the first day, I moved the cross batten further back to reduce the number of times I hit my knuckles on it while rowing. That made it better, but not great. In the end, what kept the boat’s use down were the unbearably uncomfortable square oar handles and the cramps I managed to get from the lack of a seat.
To move the batten back, I first added a new one, then removed the old one so the boat sides wouldnt spring  back together.
I managed to row a good choices into the lake. Had a had a destination, I may have gone further.
Come aboard, were expecting you.
From the boat, I was able to get the usual great views of the lake and shore.
A panoramic taken with my phone from the boat.
Though it was my intention to scrap the boat after the vacation was over, my Dad seemed to have taken a liking to it and offered to store it at his barn in Greenwich, NY until next summer. That, of course, has me thinking. I already know how I’ll be adding seats and a better pivot mechanism for the oars next year.
The boat survives, to be sailed again next summer.
While there are inherent risks in boating of any kind, and this isn’t a project you should take on without considering those risks, I’d highly encourage building a plywood boat of your own if you get a chance. The one featured on GardenFork.tv is very straightforward to build (just leave out the bottom window) or embellish it as I did. Either choice, there’s nothing like the feeling of sailing the open seas heading to Mexico in boat you crafted with your own hands.
Read More..

I Cheat At Everything

A few weekends ago I was lucky enough to attend the Lie-Nielsen Hand Tool Event they Hosted at the 3rd Ward in Brooklyn. I was able to talk tools and woodworking with many old friends and I made some new ones too. An old friend I met there was Matt Kenney of Fine Woodworking. Matt was there for the magazine. He spent his time working behind a bench and chatting with people as they came by.
Matt chats with an attendee while cutting dovetails.
Apparently, after I left Matt was called out for Cheating by an event attendee. For, Matt had committed the infraction of using a paring guide while cleaning out the baseline of the tails he was cutting.Cheating? No. As Matt told the event attendees, “There’s no such thing as cheating in Woodworking.” He does a great job of elaborating his point in a blog entry on the Fine Woodworking site.
Caught, red handed.
Cheating? Really? I don’t get the commenter. What makes woodworking so wonderful is that there’s no right choice to do anything. From how we cut a dovetail to what joinery method we choose in the first place, there are almost as many choices to accomplish the task as there are woodworkers. I’d hate to hear what the commenter would say of my drawers, jointed with 5 mm Dominos. And yet, they somehow work wonderfully.Thankfully, it’s not just me and Matt who think this of woodworking. From Todd Clippinger sharpening his scrapers with just a file to Shannon Rogers making everything by hand there is no correlation between the method a woodworker chooses and the results. Just practice the method with care and skill, and the results will be a wonderful piece.Want to see Todd cheat? Check out how he sharpens his card scraper.
Do you folk cheat?
Read More..

The Ply Wooden Boat Part III Construction

We the boat materials purchased, I returned from Lowes. Back in the drivechoice of the cabin we stay at I set up the saw horses (to realize I’d miscounted 2”x4” and only had enough to make them 24” wide) and got to work.
First I sat on and “tested” one of the plywood pieces which I had ripped to about 30” (I think that’s right, but I should have taken notes) to make the bottom of the boat. I wanted to go wider than the 24” that GardenFork.tv did in order to displace more water and provide more buoyancy. I sat on that piece and pretended to row, testing that it was an appropriate width.Once I had settled on the width I reviewed the boat bottom with my cousin Robert (who was kind enough to help record the video along with my cousin Nick) we decided that it should have some taper to it at the bow and stern. I marked out the shape with the chalk lines and the casket shape of the boat was arrived on.The next step was to install the battens which fit where the sides meet the bottom. I used a scrap of CDX to mark out the width of the sides and then used relative dimensioning to size the batten pieces. Each batten piece was sat in a double bead of M-1 sealant and screwed to the base using the Kreg screws.
Robert carefully considers the shape of the hull.
With battens installed, I cut the sides. Because of the casket shape I couldnt simply use a single, flat side piece as the GardenFork.tv boat had. Rather than make three (3) pieces per side and have that many more battens to install and joints to waterproof, I simply made kerfs in the inside face of the walls at the angle changes. When the sides were screwed to the battens, they formed around the shape of the bottom (though the cupped in slightly at the top).
Once the base was cut to size, the sides where the next to be assembled..
Next came the stern, which was a simple square piece of CDX. Because it was square, I used it to help fight the cupping that bending the sides had created. The stern was installed by seating it in more M-1 and screwing into battens between the stern and bottom and the stern and sides.The bow was installed similarly, though because it was installed at 45° to the bottom it took a bit more fudging to install and had much more cupping of the sides to deal with.
With the sides, stern and bow installed, it was time for a snack.
Once the sides were all attached, I installed a batten around the top outside edge to stiffen the sides and provide a lip to hold and carry the boat with. I also installed a batten across the top from side to side. This batten was to hold the sides apart and further reduce the cupping at the top of the sides that had resulted from bending them around the casket shape of the bottom.
Some gentle clamp pressure helped un-bow the sides so that I could install the cross batten.
The last step of construction before waterproofing was to add a keel. My keel is relatively small and oddly constructed. The bracing all around it was necessary to avoid screwing into the ?” edge of the plywood. At home, I probably would have dominoed it on. On vacation I had to settle for the Kreg screws (but no Kreg jig) I had brought with me.
Keelly.
More (Ply)Wooden Boat posts.
Read More..

Ghetto WorkCenter Boom Arm Part II The Video

Earlier in the week, I began my series on my Ghetto WorkCenter Boom Arm. Its my homemade version of a boom arm and platform that fits on the systainers that fit on my vacuum.
I was hoping to finish the description about the Ghetto WorkCenter Boom Arm before I posted the video, but Im down with a cold, so heres the video (its an easy post to write). Ill get back to the construction in my Monday post.
Do you have a boom or hook to keep your vacuum hose out of the choice?
Read More..

This Just Might Go To My Head

I’m proud to say that I’ve just had my second full length article published in Fine Homebuilding. This article is about the proper choice to flash a chimney with copper flashings in a typical asphalt shingle roof. I also have a Building Skills section in the issue specifically about bending and fabricating the copper. As I mentioned when I posted about the accompanying video, it’s tangentially interesting to woodworkers if they like mixed media pieces and think sheet metal would make a good accent.
Have chimney, will flash.
My first article was on the proper installation of an EPDM flat roof. If you didnt know, I’m a roofing project manager by day.
These two (2) articles have been very rewarding, as have the tips I’ve had published in Popular Woodworking and Fine Woodworking.
Marking copper is much like marking wood,
but with slightly less precise tools.
I mention all this, not just because I’m excited about it, and certainly not because I think it says anything about me. What I think it does say is that the magazines, in any field, are reachable, open to ideas and looking to support those who practice the respective craft. Try submitting something. You may be surprised by the response.The photos are from finehomebuilding.com
Read More..

The Ply Wooden Boat Part IV Shes Got To Float

With the keel finished, construction of the boat was done and it was time to waterproof. When Eric made his plywood boat on GardenFork.tv, he used liberal amounts of silicone caulking as waterproofing. As a professional roofer and waterproofer, this made me cringe. Contrary to popular marketing, silicone is not the be-all and end-all of caulking. When compared to commercially available urethane and moisture curing polyether sealants, silicone is crap for most applications. I used the best caulking Ive ever used, M-1, between the plywood panels & the battens. Then I sealed all of the exterior joints and the screw heads with the new M-1 Marine.
A little M-1 sealant here, a little M-1 sealant there . . .
Chem Link was kind enough to send me some M-1 Marine to try out. Its designed for applications in consistently damp marine environments. It can even be used in underwater applications (post curing). In application, the M-1 marine was just as easy to tool as standard M-1. While I cant describe my boat as consistently damp, the M-1 marine did an excellent job of sealing the joints and screws.
M-1 Marine is very good sealant.
At this point, with the boat constructed and the joints sealed, many would have called it done, put on a decorative coat of paint if desired and set out to sea.Alas, I am the few (not the many) and knowing what I do about waterproofing and having access to the waterproofing products that I do, I had to seal the boat more. Once the M-1 Marine was dry, I then coated the entire outside of the hull with BARR waterproofing, also by Chem Link.
The now empty original tube and new bucket filled with BARR.
BARR is a liquid waterproofing. It comes it what look like giant toothpaste tubes. To apply it, I squeezed the tubes out into a plastic cup and used a cheap, disposable paint brush. First I put a coat of BARR over the joints. Then I covered the entire exterior hull with BARR, right up to the underside of the batten.
The joints coated and beginning on the bow.
Once the boat was coated, I allowed the BARR to dry overnight before dropping it in the lake.
A close up of the stern and keel after being coated with BARR.
The finished boat, ready for the lake.
Coming up in Part V, well take here out on the open lake.
For more about the (Ply)Wooden boat, read these posts.
Read More..

An Alternative To Tin Can Carts Part I

My wife is a crafter . . . she’s crafty? . . . she makes things and shops at Michael’s.Before Christmas she pinned a tin can caddy on Pinterest and asked me if I could make some. She planned to decorate some tin cans for her crafting friends to use as storage and organizers. The caddy would allow them to take the cans to scrap booking parties and  the like. Of course I accepted the challenge and set about looking at the tin can caddy my wife had pinned.
The caddy on Pinterest has six (6) cans arranged in two (2) rows. Three (3) on each side of the center plywood handle. Based  on the photo, it wasn’t entirely clear how the cans are attached to the center handle. My guess is  either short screws near the top or glue.When I discussed the can attachment issue with my wife, I explained that I didn’t think a single short screw near the top would be good enough (especially as it would allow the cans to twist and the screws would work loose). I broached the idea of embedding magnet in the center so the cans would be removable. This was vetoed, but the idea of removable and swappable cans appeal to my wife. I finally settled on having a bottom to support the cans and a top ring to keep the cans attached to the handle.
My design would be made from ½” Baltic Birch plywood. Each Can Caddy would have a center handle piece, a single bottom which would run under the handle and extend out on both sides and two (2) upper can retaining pieces (1 on each side).
The original caddy.
Laying out the height of the can retaining piece.
I began by taking out a can and using it as a reference. By marking it out full scale on my bench, I figured out that ½” would be a good spacer between cans and for the width of the bottom and upper pieced to extend out beyond the cans. I simply held my hand above the can and determined how much higher the handle piece should be and where the handle opening should be.
Layout of the bottom with the curved corners.
Designing the upper can retaining pieces came next. I laid out the centers of each can cut out. I also used a compass to mark the curves at the outside corners, which were centered at the outside can centers.
The bottom would be the same shape as the upper can retaining pieces without the can cutouts.
With the design done, it was time for batch fabrication.
Read More..

The Ply Wooden Boat Part I Conception of a Crazy Idea

In September of 2011 Marc Spagnolo blogged about the plywood boat they made on GardenFork.tv. Entrigued, I watched the GardenFork.tv video and fell in love the idea. How could I say no to making a simple, functional boat out of nothing but plywood, screws, caulking and some very simple carpentry tools?
I couldn’t. So, I decided it would be the perfect family activity for our annual vacation in Lake George the following August.My plan was to pack a tool bag with the smallest tool kit possible. Then, once we were up at Lake George, I would buy the material locally, build the boat, use it in the lake and then scrap it when we were ready to go home.In order to determine the tool kit (I didn’t want to be short a needed tool or schelp unnecessary tools to and from Lake George) I first set about building a mock plywood boat.For the mock boat I used a sheet of ¼” luan plywood and some 1x3 as battens. I used my Makita 6½” 18v Li-Ion saw with a Freud ATB framing blade. I marked line with a chalk line and then cut them by eye. I screwed the whole thing together using Kreg screws so I wouldn’t have to pre-drill anything.
Much of my tool kit (and the boat making materials).
With the mock boat constructed, I packed up my Makita saw, my 12v drill, a chalk line, some clamps, a cheap plastic framing square, my Kreg screws and a handful of other small tools. I had the basic build figured out. It was time to go on vacation and build the actual boat.Before I get too far into my odyssey, heres the video that started me on my choice.
Read More..

Blog Archive

Diberdayakan oleh Blogger.