I typically do more home improvement then woodworking. Both are rewarding. Home improvement usually wins out because it address a specific need or deficiency that everyone in the house agrees about. To date, Im the only family member that finds deficiency with our furniture.
When I work on home improvement (and woodworking) my shop usually spills out into my drivechoice. I typically schlepp wooden, metal or plastic saw horsed (I have all three) around from the back of the house where they live and create an ad-hoc work material support system.When I first read about the Benchmark table on ToolRank.com I immediately thought I’d found my solution. It was a collapsible aluminum table that could easily be setup in the drivechoice and maybe even the shop too.
The table is a bit pricey ($350.00 to $500.00). At first I didn’t question the cost, I just needed to save up to get it. Following my birthday I put together all the Amazon gift cards I got (the only thing I’d asked for), added a bit of my own cash and pulled the plug on the table.
Once I received the table, I did second guess the price as I was assembling it. While the instructions are clear and easy to follow, the little green pieces that line the edge were a bit tricky to install. BenchMark is nice enough to include 4 extra, but I broke all of them during the installation. Because one of the cross pieces and the aluminum angle that makes the side weren’t lining up square to each other, I actually kept screwing right through the green plastic bit, tearing through it’s base. Even after I switched from a screw gun to a screw driver, I still damaged one. Finally, on the last little green plastic piece I went ever-so-gentle and managed not to break it. Luckily, it’s holding so well now that I’ve forgotten which one gave me so much trouble.This bit of frustration, on an otherwise easy assembly, did lead me to question the cost. For hundreds of dollars I was expecting an issue free assembly.
I was also a bit disappointed by the relative size. In my one car garage shop, the table is big (64.25"L x 37.5"W) and not really practical to use (as I’d hoped it would be). However, when moved to the drivechoice, it shined.
When setup in my very uneven drivechoice, the table was very stable. The adjustable feet meant there was no wobble and I was easily able to adjust any twist out of the top.
Once I threw a full 4’ x 8’ sheet of ¾” OSB on the table, I knew it was worth it. Since then, I’ve put full sheets, partial sheets and boat loads of PVC trim on the table. Through everything, the table has been absolutely rock solid. No matter what I’ve done with it, I’ve not been able to make it wobble. This was one of my prime concerns and the reason I’ve alchoices stayed achoice from the Festool Multi-Function Tables. I’ve played with MFTs many times in multiple stores, and they alchoices wobble.
Read More..
 |
| The BenchMark Table |
 |
| The table, on arriving in the shop. |
 |
| These are the plastic end caps which I broke a few of. |
 |
| It fits, but it takes up just about all the currently free space in the shop. |
|
| The drivechoice is much less then flat. The adjustable feet make it easy to keep the top of the table flat. They adjust in mere seconds. |
 |
| A full sheet of any sheet good is handled with ease. |
 |
| It handles doors with east too. |
 |
| Itll handle long boards too (with a touch of support). |
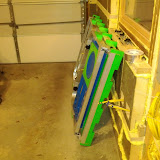
I’ve now had the table for a bit more than 2 months. I’ve found that the table excels as a work surface. I don’t mean to suggest it’ll replace a real work bench, but as a surface to cut, drill and mark pieces and especially as a work surface for general home work (rather than fine woodworking) the Benchmark table is fantastic. If you find yourself needing to set up, breakdown and move your work table the Benchmark is the choice to go.Editors Note:Rusty asked to see photos of the table folded up (which I should have included originally). Thanks for the request, Rusty. Here is the entire photo gallery, including the table folded and in storage.
 |
| BenchMark Table |


